Table of Contents
How to manage variables and conditions with RowMerge?
You have already created your first RowMerge template ? RowMerge provides a set of variables and syntaxes to generate increasingly sophisticated documents. Conditions: #if. Sometimes you want your te…

You have already created your first RowMerge template? RowMerge provides a set of variables and syntaxes to generate increasingly sophisticated documents.
Conditions: #if
Sometimes you want your template to adapt its behavior to your rows. For example write she for females and he for males. You could add a column in your table specifying he or she, but it wouldn't be elegant, and it's likely that your table already includes the information about their gender under a form or another.
You can use the {{#if}} instruction to decide what should be included in your generated document. This instruction follows one of the 2 following formats:
- Standard version to test a condition on a column value:
{{#if;column_name;second_argument;operator}}text to display if TRUE{{#end}}
Example: {{#if;Title;"Mr";==}}Mister{{#end}}- Simplified version that displays only if the column contains anything (is non-empty):
{{#if;column_name}}text to display if TRUE{{#end}}
Exemple: {{#if;Phone Number}}Phone : {{Phone Number}}{{#end}}- Both options also accept an optional #else statement to display an alternative text if the condition is not met:
{{#if;column_name;second_argument;operator}}text to display if TRUE{{#else}}text to display if FALSE{{#end}}
Example: {{#if;Title;"Mr";==}}he{{#else}}she{{#end}}
Where:
column_nameis the name of the column you want to testsecond_argumentcan be either a column name or a constant.operatorcan be <, <=, >, >=, == or !=.
Get data from several Tables: #joinrows
Ready to go a step further? You can generate a RowMerge document using data from several tables with the {{#joinrows}} instruction.
You need to let RowShare know how tables relate to each other: each other table needs to share one column with your main table. For example, if you want to join a table of tasks and a table of employees to identify the owner of each task, both tables need to list the task owner name or task owner ID.
This instruction follows this format:
{{#joinrows;linked_table_ID;column_of_the_current_table;column_of_the_linked_table}}Here is the explanation of each parameter:
linked_table_ID: the id of the external table (you find the ID in its URL, it's the last part after rowshare.com/t/).column_of_the_current_table: the column name in the table hosting the RowMerge templatecolumn_of_the_linked_table: the column name in the other table
After having inserted the text you want to repeat for each corresponding row in the other table, add #endrowsto end this section.
{{#endrows}}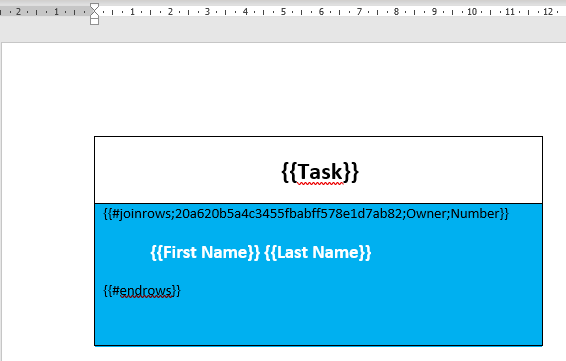
Column Formats
It is possible to specify the display format of your information by using: {{name_of_the_column:format}}.
Here are the main supported formats:
{{name_of_the_column:c}}for a currency{{name_of_the_column:p}}for a percentage{{name_of_the_column:d}}for a date{{name_of_the_column:image}}for an image
For other format options, check Microsoft web site for number formats and for date formats.
Focus on Images
For Pictures, you can use additional optional parameters, following this syntax:
{{name_of_the_column:image:horizontal scale:vertical scale:width goal:height goal}Each setting after image is optional, but you need to include the colons if you use at least one of these parameters:
Horizontal ScaleandVertical Scale: Integers representing a percentage. They represent the scale you want to apply to your picture.Width GoalandHeigth Goal: Integers representing the picture target size. Specify only one to keep initial aspect ratio. Width and Height Goals can be specified in 3 units:- px: pixels
- cm: centimeters
- twips (no format extension)
Examples:
{{name_of_the_column:image:50:50::}}Picture resized to 50% of its original height and width{{name_of_the_column:image:::400px:}}400 pixels wide, automatic width{{name_of_the_column:image::::29cm}}29 centimeters high, automatic width{{name_of_the_column:image:::500:1000}}500 twips wide, 1000 twips high
Generated Files: decide their name and number
One file per row or a single file for all rows?
If you run a RowMerge job on several rows, by default, a ZIP archive is created with a document for each row.
You can specify that you want a single file containing all rows. This is done by adding at the end of the document the {{#beginrows}} , {{#endrows}}and{{#onefile}}instructions.
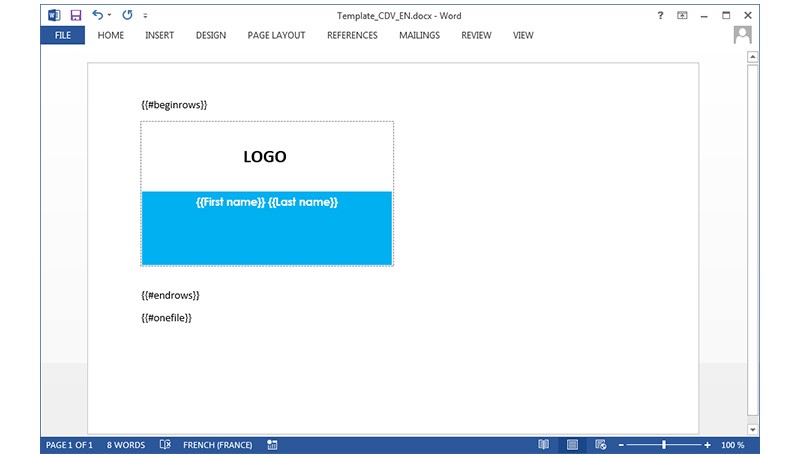
The {{#onefile}} instruction indicates that only one file will be produced, whereas the{{#beginrows}} and {{#endrows}} tags show which area of the template will be repeated for each of your table's rows. In this case, the full document will be duplicated for each row. But you could have a document header that wouldn't be repeated and therefore left outside of the{{#beginrows}} {{#endrows}}section.
You can download the complete example by clicking here.
You can add options to {{#beginrows}} and {{#joinrows}} to limit loading or to sort rows:
Min: set to 0 to avoid line breaksMax: Maximum number of rows loadedOrderBy:Name_Of_The_Column: Sorting in ascending orderOrderByDescending:Name_Of_The_Column: Sorting in descending order
File Name: #filename
You can edit the name of the generated file(s) by using the command {{#FileName;name_of_file}}:
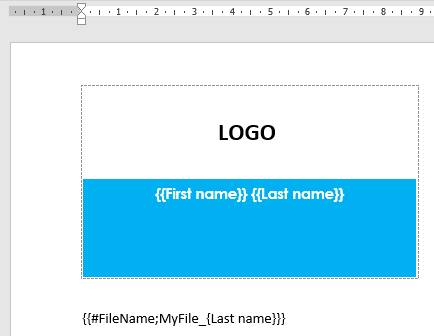
As illustrated above, you can add the contents of a column to the file name to make it more descriptive: {{#FileName;Name_of_the_file_{Column}}}.
You can download an example here.
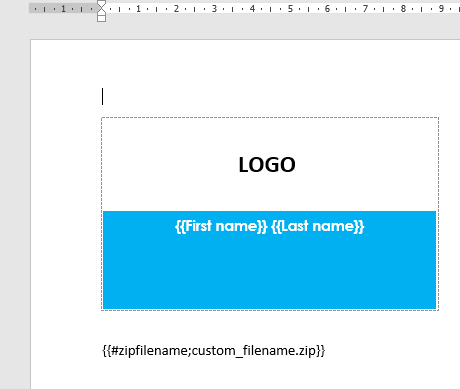
Zip Archive File Name: #zipfilename
Similarly, you can edit the name of the generated archive by using the command {{#ZipFileName;name_of_file}}:
You can download an example here.
JavaScript and more
In RowMerge document templates, it's also possible to add JavaScript code and use Word formulas.
Our team at RowShare is also available to create RowMerge templates for you. Share your need and ask for a quote.
How did we do?
How to create, add or modify a RowMerge template?
How to use JavaScript in your RowMerge templates?